
How to install window decals the right way


Most window decal mistakes happen in the first 30 seconds. Bad prep, wrong placement, peeling too fast. Get those three things right, and the rest takes care of itself.
What you need before you start
Before you begin, gather your materials so everything is within reach.
- Your window decal or window sticker
- A spray bottle
- Mild soap and water, or your own solution with a few drops of dish soap
- A lint-free cloth or paper towels
- Masking tape
- A squeegee or a credit card
- Measuring tape, if you want centred placement
- A pin for stubborn bubbles
- Rubbing alcohol, if there is residue to remove first
Check what type of decal you have
Not all window decals install the same way, so check the product type before you start. That will tell you whether you need a dry application, a wet application, or transfer tape.
- Standard adhesive decals have a sticky backing and are designed for outdoor glass surfaces. They bond firmly and are meant to stay put.
- Front adhesive window decals are applied to the inside of the glass and displayed facing outward. The adhesive goes against the glass, and the design faces in.
- Static clings do not use adhesive. They cling to smooth glass and are easy to remove and reposition, which makes them a good choice for temporary use.
- Transfer decals or lettering come with a transfer tape layer on top. The design sits between the liner and the tape, and you apply it by peeling the liner, pressing the decal onto the glass, and then slowly peeling the transfer tape away.
If you are not sure which type you have, check the product instructions before you start.
Clean the window properly
This step matters more than most people think. Dust, grease, and residue on the glass can stop the adhesive from bonding well and leave bubbles trapped underneath.
Wipe the window down with mild soap and water, or use rubbing alcohol if there is sticky residue left behind. Then dry it completely with a lint-free cloth or paper towels. Window decals apply best to clean, smooth glass, so make sure the surface is fully dry and free of dust before you move on.
Temperature matters too. Extreme heat or cold can affect adhesion, so avoid applying the decal when the glass is very hot, very cold, or damp.
How to put on a window sticker
1. Test the position first
Before you peel anything, hold the decal against the window and check the placement. Look at the centre, the height, and the spacing around the edges.
Use a measuring tape if you want it perfectly balanced, and mark the middle of the window as a guide.
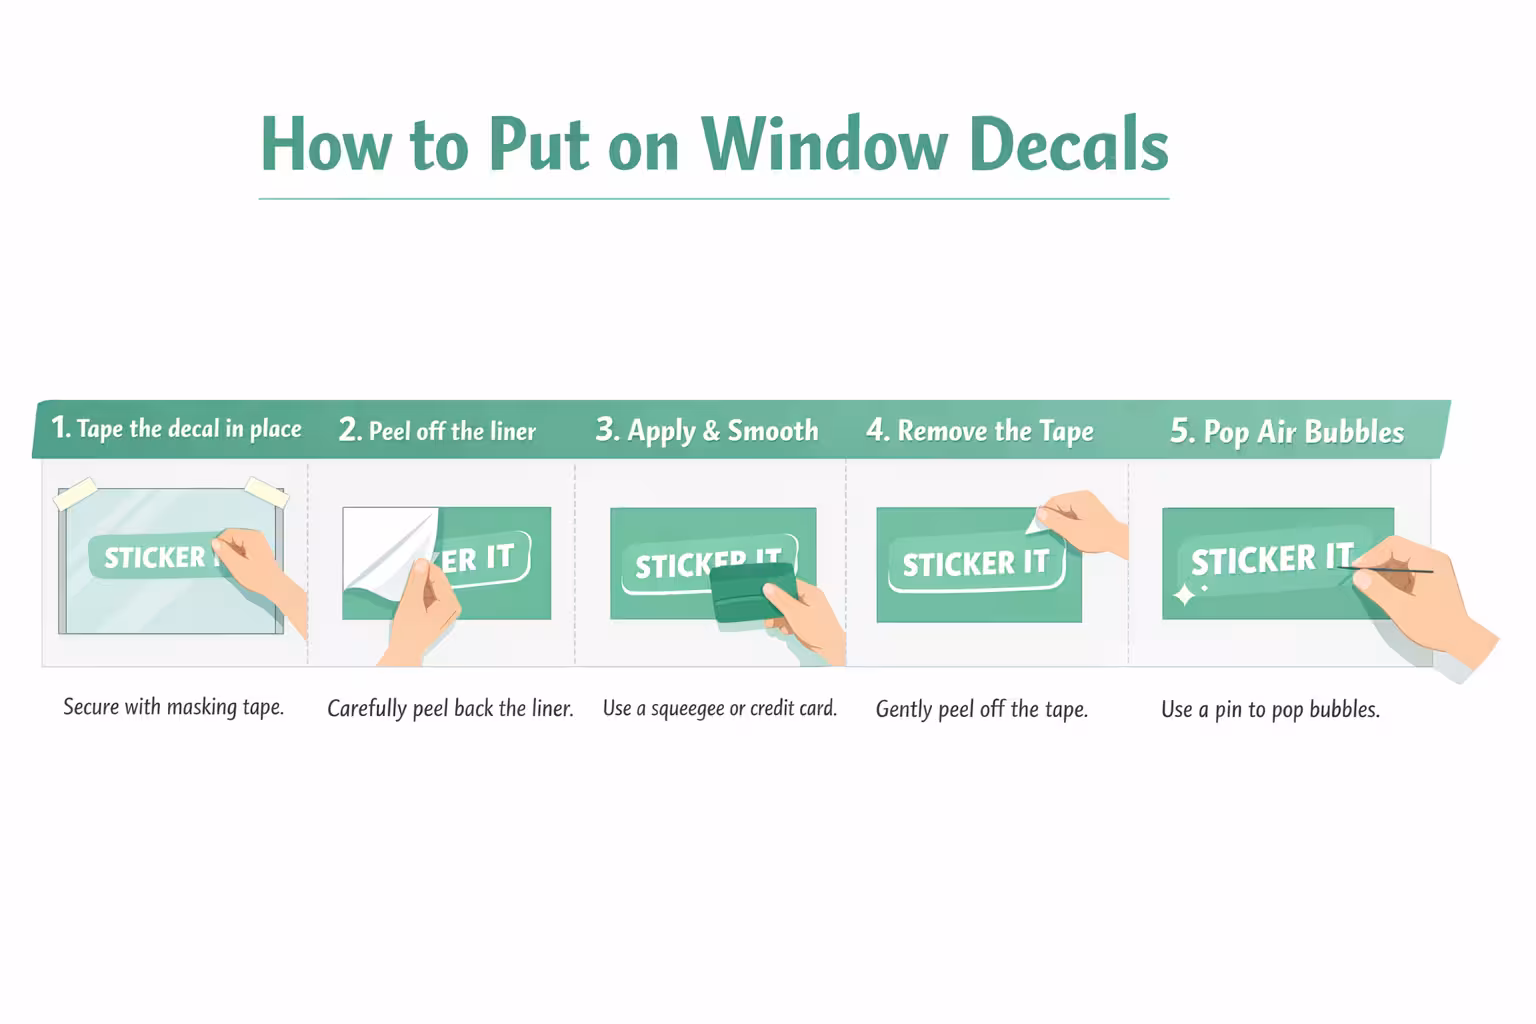
2. Tape the decal in place
Once you are happy with the position, use small pieces of masking tape to hold the decal against the glass.
This creates a guide so it does not shift while you work. For larger decals, run a strip of tape along the top edge to create a hinge you can work from.
3. Carefully peel the liner
Start at one corner and carefully peel the liner away from the back. Go slowly.
For larger designs, peel back just part of the liner at first rather than removing the whole thing at once. Try not to touch the adhesive too much as you go.
4. Apply the vinyl decal from one side to the other
Place the exposed adhesive section onto the glass first, then gradually smooth the rest down. Do not let the whole decal drop onto the surface at once.
Working from one side to the other gives you more control and helps you avoid trapping air underneath.
5. Use a squeegee or credit card to push out air
Press the decal down using your squeegee or credit card, working from the centre outward towards each edge. Use firm, even pressure. This is the most effective way to smooth out air bubbles and get a flat finish.
6. Slowly peel off the transfer tape if there is any
If your decal has transfer tape, slowly peel it away at an angle once everything is pressed down. If any part of the design lifts with the tape, stop and press it back onto the glass before you continue. This part takes patience. Pull too quickly, and the decal may not stay in place properly.
How to apply a window decal without bubbles
Bubbles usually come down to a few simple things. Here is what actually helps:
- Clean the glass properly before you start
- Apply the decal gradually, not all at once
- Smooth from the centre outward with even pressure
- Work slowly instead of rushing through it
- Avoid installing in extreme heat or cold
- For some decals, a light mist of soapy water can help with positioning before the adhesive fully bonds, but only use this method if the product is suitable for wet application.
For stubborn bubbles that will not smooth out, use a pin to make a tiny hole and gently press the air out. Most small bubbles disappear on their own within a few days as the adhesive settles.
Tips for larger window decals
Big decals need a bit more setup, but the same basics apply.
Measure the window carefully and mark your placement before you touch the liner. Use masking tape to create a hinge along the top edge, then work in sections from one side to the other rather than trying to apply the whole thing at once.
If the design is wide or awkward, ask someone to help. An extra set of hands makes it easier to keep the decal straight and stop it from folding onto itself or touching the glass too early
Conclusion
Putting on window decals is easy when you take it step by step. Clean the glass, line the decal up carefully, and smooth it down slowly to avoid bubbles.
If you want custom window decals that are easy to apply and made to last, Sticker it can help. We print on clear vinyl, offer front adhesive options, and send a free proof before printing so you can check everything first.
FAQs
Should window decals go on the inside or outside?
It depends on the product. Standard adhesive decals are usually designed for the outside of the glass. Front adhesive decals are made to be displayed from inside the window, with the design facing out through the glass.
Can you put window decals on car windows?
Yes, and the process is the same. Clean the glass first, test the placement, and apply slowly. Avoid curved surfaces if your decal is large and rigid, as it may not conform well.
Can you apply window decals with soapy water?
You can, but only if the product is suitable for wet installation. Use a spray bottle with water and just a few drops of dish soap, then apply a light mist only. Too much liquid makes it harder to secure the decal and push out bubbles.
How long should you leave a window decal after applying it?
After installation, press firmly over the whole decal one more time, paying extra attention to the edges. If you used a spray bottle, wipe away any excess moisture, then leave the decal alone.
Give the adhesive time to bond before you clean the window or touch the decal. Exact timing varies by product, but leaving it undisturbed for at least 24 hours is a good rule.
Subscribe to our newsletter
Enter your email below to stay up to date on Sticker it's latest, including new product launches, exclusive deals and more.