
How to make your own glitter stickers for a planner


Are you looking for a fun and creative way to add some personality and organization to your life? Decorating your planner with glitter stickers is the perfect solution!
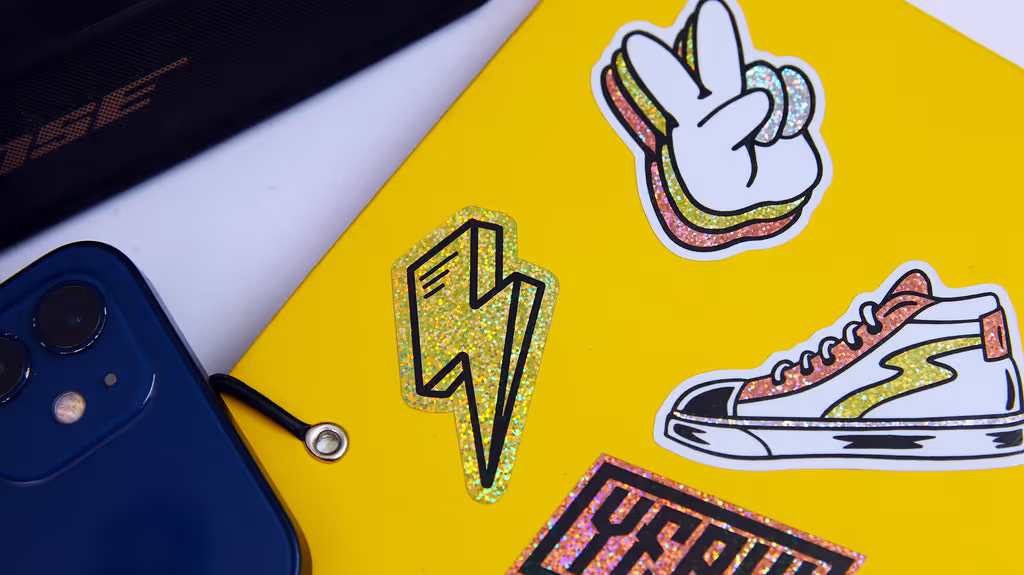
Glitter adds just the right amount of sparkle and flair while helping you stay organized. Plus, making them yourself means you can customize them however you like. Here’s how to make your own glitter stickers for planners in four easy steps.
Find designs you love
When it comes to finding designs for your glitter stickers, the possibilities are endless! You can browse online for inspiration or get creative and make your own designs from scratch.
Some of our favorite sources for free design elements are:
For pre-made templates, fonts, and icons, Canva and Graphic are great places to start.
You can also experiment with different colors and shapes to make your glitter stickers stand out even more. Don’t be afraid to let your imagination run wild and create designs that really reflect your personality and style. Who knows, you might discover a hidden talent for graphic design!
Source a glitter background
Once you’ve decided on your designs, it’s time to find the perfect glitter background.
This background won’t be printed, it’s an optional step that acts as a visual aid to help you picture what your design will look like.
You can add this background to your design as a clipping mask.
- Open your design in Adobe Illustrator
- Add the glitter image via “Choose file” > “Place” and select your image
- Embed the glitter image by selecting “Embed”
- Cut the glitter image and paste it to your dashboard (Ctrl+X or Cmd+X). Double-click the area you want, then go to “Object” > “Compound path” > “Release”
- The glitter background appears. Position it and send it to the back: “Object” > “Arrange” > “Send to Back”
- Select the area you want to sparkle. Click “Object” > “Compound Path” > “Make”
- Go to “Object” > “Clipping Mask” > “Make” to lock the glitter into your design
Add a custom cutline
Before cutting out your glitter stickers, you can add a custom cutline.
A cutline shows where the sticker will be cut. Cutting machines use it to follow the exact shape. It’s also helpful if you’re using a Cricut or cutting by hand.
This step-by-step tutorial explains how to create your own custom cutline.
Sheet or stickers?
Now it’s time to decide whether you want to turn your glitter design into individual stickers or keep them on a single sheet.
Individual stickers are great for handing out or selling one at a time. They’re also perfect for standard shapes.
Sticker sheets, on the other hand, make it easier to store your designs. If your designs are complex, a sheet can make them quicker to peel. If you’re cutting your stickers yourself, sheets are a bit more difficult because you need to cut only through the top layer, not the backing.
Make your own glitter stickers
If you’re ready to make your glitter stickers for your planner, here’s how to get hands-on:
1. Print out your design on your glitter material of choice
Printing your design on glitter material is step one. You can choose from vinyl, foil, or cardstock in finishes like holographic, metallic, or matte. We recommend a waterproof, adhesive-backed material to make your job easier.
2. Laminate your stickers (optional)
Laminating adds durability and shine. It helps protect your stickers from dirt, water, and UV rays. This is especially helpful if you're using vinyl or cardstock, which may not be waterproof on their own. The process is simple, apply laminating film over your design and use heat to seal it. This gives a glossy finish that makes your glitter stickers stand out even more. If you're interested, read a thorough guide on how to laminate your stickers.
3. Cut your stickers into shape
Once your design is printed and laminated, it’s time to cut it. Use a die-cutting machine like Cricut or Silhouette. If you don’t have one, scissors or a craft knife will do, just be careful and take your time.
4. Make them stick
Now it’s time to apply your stickers. Peel off the backing and press the sticker onto your chosen surface. If your material isn’t adhesive-backed, use a glue stick or double-sided tape to apply it to your planner, notebook, or wall. You can also use glitter glue for a 3D effect or seal it with clear contact paper to make it waterproof and tear-resistant.
Trust a professional
Not feeling confident enough to make glitter stickers yourself? It might be worth hiring a professional. Many companies specialize in custom sticker design and printing, so you can be sure your stickers will turn out great and last longer too.
1. Find a sticker printing company that offers glitter materials
Sticker printers are easy to find, but not all of them offer glitter materials. (Psst, we do!) If you’re unsure, ask for a sample before placing your order. This is the best way to compare your options.
2. Enter your size
Once you’ve picked your company, go to the glitter stickers product page. Enter the size of your sticker, this will usually generate a price quote instantly so you can see which quantities offer the best deal.
3. Choose your shape
Now choose the shape of your sticker. You can go with circles, squares, rectangles, or something more custom. Many companies offer die-cutting, which lets you create almost any shape you can imagine.
4. Upload your artwork
Finally, upload your artwork and place your order. The printer will handle everything, and once the glitter stickers arrive, you’re ready to get creative.
Adding glitter stickers to your planner is a great way to stay organized and add sparkle to your day. Whether you make them yourself or work with a professional, the result will be something fun and unique. So give it a try and let your creativity shine! Any questions? Get in touch with us!
Subscribe to our newsletter
Enter your email below to stay up to date on Sticker it's latest, including new product launches, exclusive deals and more.