
How to make transfer stickers

If you want stickers that look clean, precise, and actually professional, transfer stickers are hard to beat. They’re especially useful when your design has multiple separate parts, like letters or fine details, because everything stays perfectly aligned during application. Let's learn how to make them!
What are transfer stickers?
Transfer stickers are vinyl designs that are applied using transfer tape rather than a traditional backing. Only the design is placed on the surface, so there’s no visible background.
They’re especially useful for layouts with letters or smaller pieces, where keeping everything aligned would be difficult with a regular sticker.
What you need
Materials
- Vinyl (permanent or removable) – high-quality vinyl is usually around 3–4 mil thick and is weatherproof and UV-resistant
- Transfer tape
Tools
- Cutting machine (like Cricut Design Space used with a vinyl plotter) or a craft knife
- Weeding tool (hook or needle)
- Squeegee or burnishing tool (a credit card also works)
How to make transfer stickers
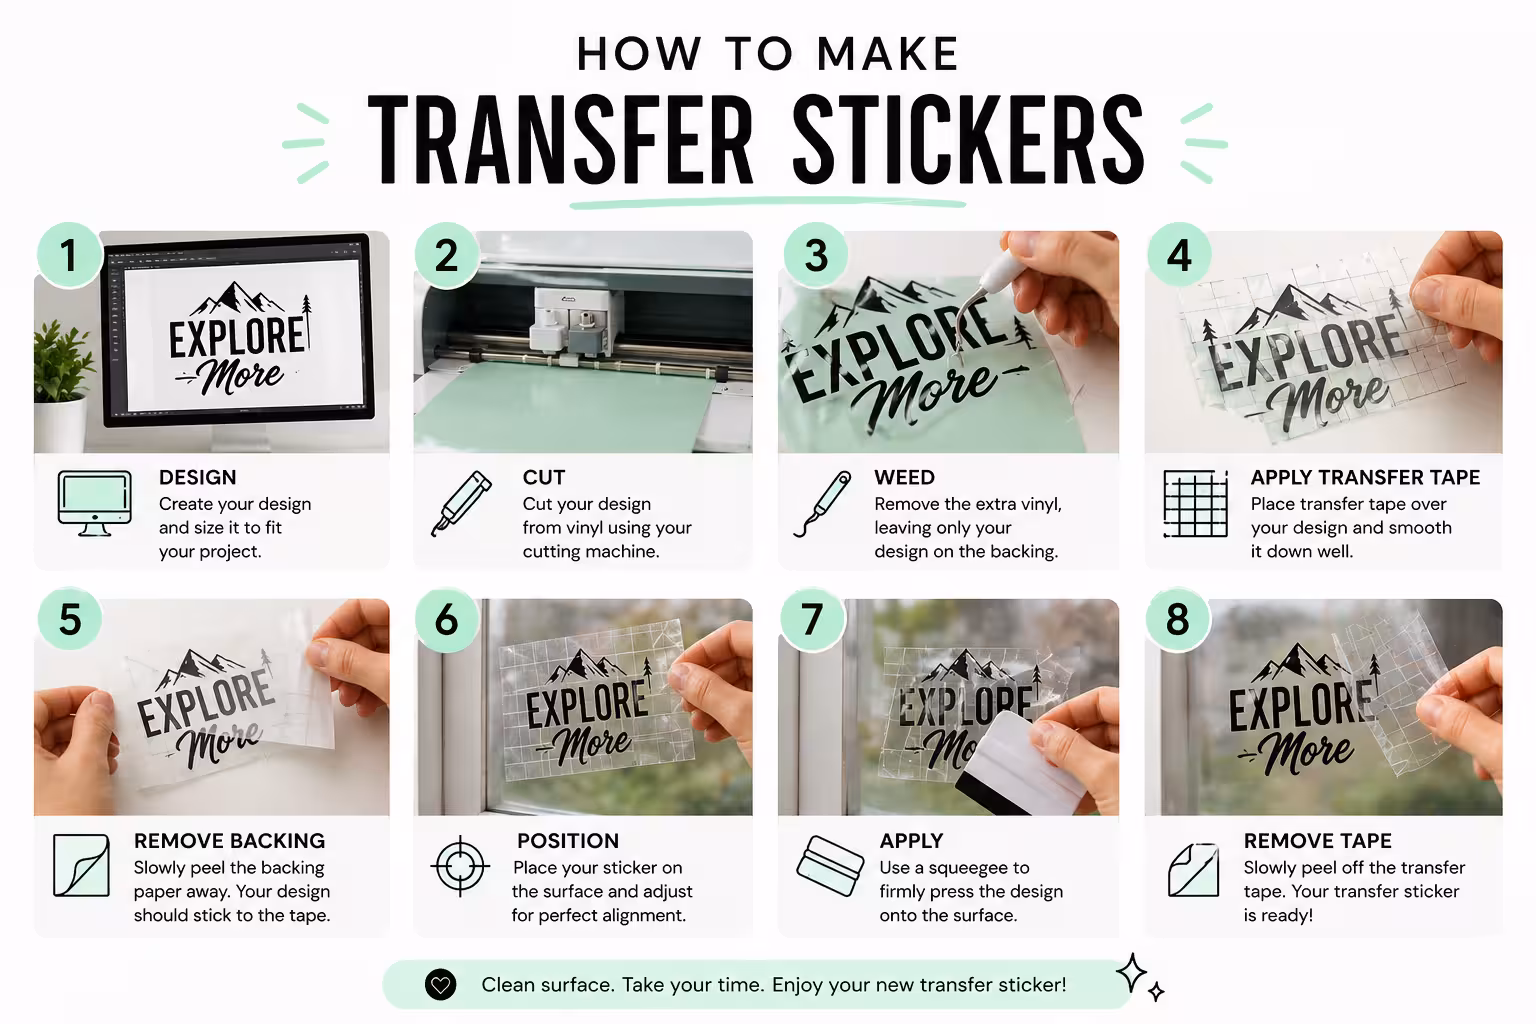
Step 1 – Create your design
Start by creating or choosing an image you want to turn into a sticker. You can use tools like Cricut Design Space or any design software.
If you’re using a cutting machine, your design should be in a vector format (like SVG) so the machine can follow clean paths. Keep the design simple. Very thin lines or tiny details are harder to cut and can break during transfer.
Step 2 – Cut the vinyl
Place your vinyl sheet into your cutting machine or on a cutting mat if you’re cutting by hand. The goal is to cut the design without cutting through the backing paper.
If you’re using a machine, make sure your settings match the vinyl type. A dull blade or wrong pressure can ruin small details.
Step 3 – Weed the design
Weeding means removing all the excess vinyl that is not part of your design.
Use a weeding tool to carefully pull away the unwanted pieces. Only your final image should remain. This step is manual and can take time, especially for detailed designs, which is one reason transfer stickers can be more expensive to produce.
Step 4 – Apply transfer tape
Cut a piece of transfer tape slightly larger than your design and place it over the vinyl.
Press it down firmly using a squeegee or burnishing tool. This step is important because the tape needs to adhere evenly to hold all parts of the design together during transfer.
Step 5 – Apply the sticker
Peel the backing paper away slowly. The vinyl should lift with the transfer tape.
Place the sticker onto a clean, hard surface like glass, plastic, or metal. Press it down evenly, then peel off the transfer tape at an angle. The vinyl design should stay on the surface.
Choose the right vinyl
The type of vinyl you use affects how your transfer stickers perform.
- Permanent vinyl
Best for outdoor use, car decals, and long-term applications. It sticks strongly and resists water. - Removable vinyl
Better for indoor use or temporary projects like pantry labels or wall designs. It peels off more easily.
Common problems (and fixes)
- Vinyl not sticking to the surface
The surface may not be clean. Wipe it down and make sure it’s dry before applying. - Design lifting with the transfer tape
The tape might be too sticky, or the vinyl wasn’t pressed down enough. Try burnishing again before peeling. - Air bubbles under the design
Apply pressure slowly and evenly. Use a squeegee to push out trapped air. Learn how to deal with air bubbles. - Small pieces are tearing or not transferring
The design may be too detailed, or the cut wasn’t clean. Adjust your blade or simplify the shape.
Can you make transfer stickers without a machine?
Yes, but it’s more limited.
You can create simple DIY stickers using packing tape transfers. This involves printing an image on regular copy paper, covering it with packing tape, and pressing firmly so the tape adheres to the ink.
Then soak it in warm water for a few minutes and gently rub away the paper side until only the image remains on the sticky side. This creates a clear sticker effect that can be applied to hard surfaces.
Transfer stickers vs regular stickers
Transfer stickers and regular stickers serve different purposes.
- Transfer stickers
No background, clean edges, ideal for text, logos, and decals - Regular stickers
Printed on a full sheet, easier to apply, better for complex images or colourful designs
If your design has multiple parts or needs precise placement, transfer stickers are usually the better choice. If your design doesn't have separate parts but you need an exact shape, go for die cut stickers.
Final thoughts
Making transfer stickers at home is a great way to learn the process and test ideas. With a bit of practice, you can get really clean results, even with smaller details.
But if you need something more polished or in larger quantities, Sticker it’s transfer stickers are a solid option. They’re made with high-quality vinyl and arrive ready to apply, so you can focus on your design instead of the process.
FAQs
What is transfer tape?
Transfer tape is a clear or slightly translucent adhesive layer used to hold all parts of a vinyl design together during application.
It allows you to move the entire design at once instead of placing smaller pieces individually.
Can you make packing tape stickers?
Yes, you can make simple packing tape stickers by printing an image on regular copy paper, covering it with clear packing tape, and removing the paper side. The tape adheres to the ink, leaving just the image behind.
This method works for basic DIY stickers, but it won’t be as precise or durable as vinyl transfer stickers.
Are transfer stickers good for pantry labels?
Yes, transfer stickers are great for pantry labels, especially if you want a clean, minimal look. Since there’s no background, labels on jars look more polished compared to regular stickers.
For long-term use, permanent vinyl works best on glass jars and other hard surfaces.
Why are my DIY stickers cloudy or not clear?
This usually happens when some paper is still stuck to the tape. Make sure to fully soak and gently rub off the paper side until only the image remains.
Using magazine paper instead of regular paper can also give a clearer result.
Can transfer stickers be applied to any surface?
Transfer stickers work best on clean, hard surfaces like glass, plastic, or metal. Rough or textured surfaces can prevent the vinyl from sticking properly.
Do I need a Cricut to make transfer stickers?
No, you don’t need a Cricut. You can cut designs by hand for simple shapes, but machines make the process much faster and more precise, especially for letters and smaller pieces.
Subscribe to our newsletter
Enter your email below to stay up to date on Sticker it's latest, including new product launches, exclusive deals and more.