
How to design laptop stickers


Are you looking for a way to show off your unique style and personality? If so, laptop stickers are the perfect solution! With laptop stickers, you can customize your device with a logo, fun designs, meaningful quotes, and almost anything else you can imagine. They add a layer of personalization to your computer or laptop and are also easy and inexpensive to make.
So if you’d like to learn how to design custom laptop stickers, read on! Here is a step-by-step guide that will help you create one-of-a-kind pieces of art that express who you are.
Think about what type of sticker you want
When it comes to designing laptop stickers, it's important to take some time to think about what kind of stickers you want before starting the design process. This will help ensure your final product reflects your style and personality in a meaningful way.
Ordering custom stickers means you not only get to create your own design, but you can also pick:
- The material your stickers are printed on
- The shape of your stickers
- The size of your stickers
- The number of stickers you need
Consider these elements while brainstorming your design to narrow down your options and make sure everything fits together well. Planning ahead can save you a lot of time later!
Create a design or start browsing
Once you know what kind of sticker you want to make, it’s time to get creative! Whether you’re starting from scratch with your own artwork or browsing through pre-made templates and graphics online, having a concept ready to go is key.
It doesn’t have to be perfect, you can always make changes as you go, but having a starting point will help keep your vision on track during the design process.
If you’re not experienced with design programs like Adobe Illustrator or Photoshop, you can use platforms like Canva to edit pre-made designs. There are also plenty of great free online resources:
- VectorStock – Hundreds of thousands of free vectors
- Flaticon – Thousands of free icons
- DaFont or Google Fonts – Tons of free fonts
- Burst by Shopify – Free photos for commercial use
Or, if you'd like to turn a photo into a sticker, check out our guide: how to turn pictures into laptop stickers.
Arrange your artwork
If you’re submitting more than one design or creating a sheet of different stickers, think about how you want to arrange them.
Ordering a sheet with multiple designs is a great way to save money and create a cool aesthetic for your laptop. It’s also a good way to test how your designs look together.
Start by creating a rectangular shape to represent your full sheet. Then place your individual designs on it. Make sure each design is spaced 4mm apart and is at least 2cm tall or wide.
Add a custom cutline
Once you’ve finalized the placement of your elements, you can add a custom cutline.
A cutline marks the edge of your stickers. It won’t be printed but tells the machine where to cut.
There are two types of cutlines:
- Thru cut: cuts through both the sticker and the backing paper
- Kiss cut: cuts only through the top layer of material (ideal for sheets
Check out this video for a full walkthrough:
No worries if you don’t want to add a cutline yourself - our team can handle that once you upload your design. A magenta line will show the cutline on your proof (but won’t be printed).
See what's the difference between die-cut and kiss-cut stickers.
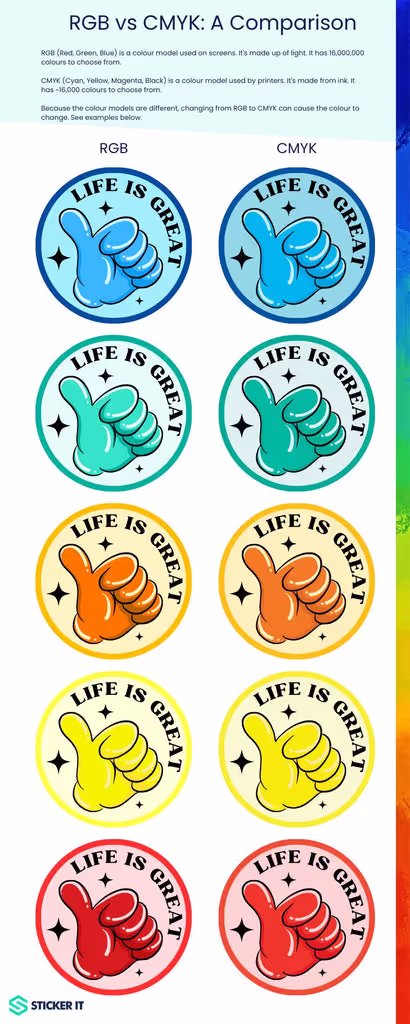
Set your colors to CMYK
Did you know the colors on your screen are different from the ones that can be printed?
Screens use an RGB color model (red, green, blue) and can display over 16 million colors. Printers use CMYK (cyan, magenta, yellow, black) and print around 16,000 colors.
This means your screen can show colors that can’t actually be printed. That’s especially important when it comes to brand colors.
To avoid surprises, switch your color mode to CMYK in your design file before sending it to print. This gives the most accurate preview of how your laptop stickers will look.
Convert your text to outlines
If your design includes any text, make sure to convert it to outlines before exporting.
There are thousands of fonts out there, and your print provider might not have the one you used. If they don’t, your font could be substituted or look different when opened.
To prevent this, convert your text to outlines. This changes your text into shapes, locking in your design just as you created it.
Watch this quick video on how to convert text in Illustrator:
Export your artwork as a vector
When you’re done, export your design as a vector file.
Vector files are built from math-based paths, so they scale cleanly and print at high resolution - unlike raster images made from pixels.
If you don’t have a vector version, just upload the highest-resolution file you can. Keep in mind that low-quality artwork can result in blurry or pixelated prints. We also have a free vectorizer tool!
So what are you waiting for? Start designing your custom laptop stickers and show off your creative side! Follow the steps above to make sure each sticker turns out just right. And if you need help at any point, our team is here to support you.
Subscribe to our newsletter
Enter your email below to stay up to date on Sticker it's latest, including new product launches, exclusive deals and more.